
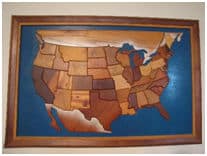
How It Started
My wooden map making began a bit over 20 years ago when my 8 year old granddaughter, Mikaila, came to me to ask if I could be helpful to her on one of her projects. She was a homeschooled child and into doing a few things that didn’t always follow the norm. We kicked around a number of options and finally settled on making a wooden map of North America and if possible, use wood specimens from all states and provinces. This was determined to be an important factor for the finished map. Click image to enlarge.
She initially wrote a letter to Country Magazine for their “Can You Help Me” page, explaining the proposed project and asked for a piece of wood from every state. It took some time and a bit of prodding to get her letter published, but once in print the wood began coming in, sometimes by the box full. The interesting thing was that nearly every piece of wood came with a story. A piece of hard Maple from Pennsylvania was a piece of old flooring that had come from the floor of the first Hershey’s Candy Factory and it was more than 100 years old. A piece of Wormy Chestnut from Tennessee came from an old barn that had fallen and it was about 200 years old. Mikaila also established several lasting friendships with many of the suppliers of wood. She also kept a good set of records of all the woods received, as well as learning a lot about the geography of North America and established some great communication skills. When her map was finished, she sent photos to all who contributed and Country Magazine quickly published a story on the finished product.
After the first map was completed several more similar maps were made, some used as donations and others for folks who wanted one for their homes. (At the IWCS AGM in Tacoma WA one of the North American maps was donated to the craft auction and it brought in a price of around $600.)
Map Blanks
In order to make it easier to produce additional maps with much less sawing and shaping, we developed a system that allowed us to make a number of them by sawing out much thicker pieces and then cutting them into multiple ¼” thick States. It is also best to cut all the ¼” slabs at the same saw setting. In order to keep the thickness uniform throughout. We were able to get as many as 7 to 8, ¼” thick pieces from a single blank.
Starting Patterns:
In order to get a pattern to transfer to the wood block to make the individual State blanks a tracing is made from a map of the size we wished to produce. A “Fine Point Sharpie” pen was used to trace the State borders onto a sheet of transparent paper or velum. Xerox copies were then made from this master tracing and individual States were then cut out and attached to the wood block using rubber cement. The Xerox copy then had a State border about 1/32” wide that could be easily followed with a ¼” bandsaw blade. With careful sawing, it was possible to saw very close to the outside of the line and get a reasonably close fit to the adjoining States. It was determined that it is far better to have a bit more than needed than too little.
When selecting wood species for each State, some attention to color contrasts is recommended. If there are several options for each State, this will enable you to get a much more pleasant color scheme overall.
The Fitting Process:
The tools required for the fitting process are; A variable speed Dremell tool, (2 such tools are even better) Various cutting burs, A small drum sanding tool, A flat disc sanding tool, and various small files.
A complete print of the map is needed to begin the fitting process. And, it is desirable to have latitude and longitude lines on this print as it allows a good reference as the size of the assembly grows. (Early on it was found that a small fit or angle problem in one area gets magnified as the assembled area expands.) A bit of experience quickly pointed out that it is best to start the fitting in the approximate center of the map and work outward.
Two very important factors in the fitting process is the moisture content of the wood pieces and the temperature at which you will be working throughout the process. It is desirable to have all the pieces in a similar environment for a week or two prior to starting the fitting and to keep them all in the same environment while fitting. Early on it was found that pieces that fit quite well on a given day would not fit nearly as well if the moisture and temperature changed very much over the next day or so. Once you are satisfied with the fit of two pieces it is recommended that they be taped together with masking tape before adding the surrounding States. If the fitted pieces are to be left for more than a week prior to gluing to the backboard the tape adhesive may remain on the wood surfaces. Do not be too concerned about the tape residue as it can be removed with light sanding after all the pieces are glued to the backboard.
It is also desirable to chamfer the edges of the upper surface of each piece. This reduces any noticeable difference in thickness of the pieces and makes the fitting process a bit easier.
Map Mounting Surface or Backboard:
The backboard or mounting surface can be any 1/8” to 1/4” panel of your choice. Initially, a 1/4” Mahogany laminated sheet was used and it was painted blue to signify the ocean. This background appeared a bit too blue and we looked for something much more suitable. A ¼’ thick sheet of laminated Russian Birch was found that had a light and interesting wood grain. This surface was well sanded to remove any roughness and then stained with a light coat of blue alcohol based dye. Some amount of thinning was required in pre-testing to determine the desired color. It was then applied with a soft cloth to achieve an excellent representative of the ocean.
After the dying process was completed, the latitude and longitude lines were applied and adequately marked around the perimeter of the backboard. It is important to do the marking in order to prevent gluing on the States in the wrong place. It is also important to do the marking with a pen or pencil that will not be distorted by the finish coatings of lacquer or other finish that will be applied after the States are glued in place.
Mounting the States:
With all the fitting of the States completed it is now time to glue them to the backboard. It is best to mark temporary latitude & longitude lines on a few of the states that will match up with the lines on the backboard. These marks should be placed in areas where masking tape already exists so that no marks are put onto the wood surfaces. The sections of states that are taped together should be about 6” square to make them fairly easy to handle. Apply a generous layer of glue to the back of the section and place it carefully onto the backboard making certain that the latitude & longitude lines match. Apply a weighted object on top of the section and allow the glue to set. Several sections can be added at a time as long as you have sufficient weights to keep them in place while the glue sets. A thick CA glue or a quick setting glue such as Titebond II work quite well for this step.
Prior to gluing in place the second, third and other sections of States, make absolutely sure that the next one fits well with those already in place. It is not unusual to find a slight change has taken place and some additional fitting may be required. Be certain to do this with each section being added to those already in place.
Once all the pieces are well glued in place it is time to add the final finishing, a good quality lacquer or other good clear finish.
Map Framing:
A quality frame is definitely a worthwhile consideration for the finished map. If you are good at making frames, that is a definite plus. If you are not, it is recommended that a qualified framer be commissioned to frame your masterpiece.
Other Map Projects:
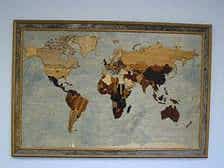
World Map
After completing several of the North American maps the desire to expand to other subjects came to mind. The next one was a World Map and keeping with the practice of using wood species either from the country represented or indigenous to that country was again considered. Realizing that the collection of wood would then be a major effort, a number of friends from around the world were asked to help. As it turned out this collection process took well over a year to accomplish. One particular problem was the Balkan Countries in Southern Europe. It was then discovered that there is an IWCS member in Slovenia, Anton Suhadolc, so I contacted him for assistance. Initially, I sent to him a package of my Maple Leaf Lapel Pins and an explanation of the map making project and asking if he’d be willing to trade wood from Slovenia as well as surrounding Countries. Anton responded quickly with a box of wood covering nearly all of Europe. He also wrote a few weeks later saying that there were two other ladies in the family who would like to have a leaf pin. I was only too happy to send more. A copy of the World Map was donated to the IWCS Craft Auction at the AGM meeting in Madison WI, which sold for $2,000.
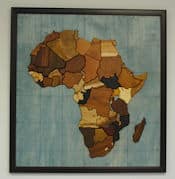
Africa Map
A few years later a map of Africa was considered and having travelled there a number of times, my wood supply from many Countries was already in my shop. Again, with the help of several others, the Africa map became a reality as well. A copy of the African map was also donated to IWCS prior to the meeting in Canada. I believe it was actually sold on-line.